
ComfyUI Explained: How Node Workflows Turn Local AI Image Generation into a Pipeline You Control
A practical guide to ComfyUI: why it uses nodes instead of fixed buttons, what hardware it really needs, how the basic text-to-image graph works, which KSampler settings matter, and how img2img, inpainting, LoRA and ControlNet plug in.

Open image models such as Stable Diffusion, Flux and Qwen Image are like an engine without a dashboard. You need software that turns your prompt, settings and reference images into something the model understands, then turns its output back into a picture you can save.
ComfyUI is the most flexible of these tools, and the most intimidating at first sight: instead of a form with a Generate button, you get a canvas of boxes and wires. This guide explains what those boxes do, what hardware you need, and how to build and adjust the standard workflows yourself.
Why nodes instead of fixed buttons?
Form-based interfaces such as Forge or Fooocus wrap the generation pipeline in fixed screens: you fill in fields, press a button, and the steps in between stay hidden. That is fast to learn, but changing the pipeline itself means waiting for the developers to add an option.
ComfyUI shows the pipeline as a graph. Each step (load a model, encode the prompt, sample, decode, save) is a separate node, and you connect them with links. You can see every intermediate result, swap one part without touching the rest, and save the whole graph as a reusable workflow. It is not the only tool with this idea: InvokeAI, for example, also has a node-based workflow editor alongside its canvas.
Scroll horizontally to see all columns
| Aspect | Form-based interfaces | ComfyUI |
|---|---|---|
| Pipeline | Fixed by the developers | Built from nodes you connect and rearrange |
| Visibility | Intermediate steps hidden | Any output can be previewed or reused |
| Re-running | Usually reruns the whole job | Reruns only nodes whose inputs changed |
| Media | Mostly still images | Images, video, audio, 3D and more, depending on the model |
| Learning curve | Gentle | Steeper at first |
The re-running row matters: ComfyUI only re-executes the parts of the graph whose inputs changed, so tweaking the final step does not reload the model or redo everything before it.
What hardware do you need?
Three parts of your computer do the work. The graphics card's memory (VRAM) holds the model weights being used and the tensors the sampler works on. System RAM holds models that are loaded but not needed right now, and parts of a model when it does not fit in VRAM. The SSD stores the model files, which are often several gigabytes each.
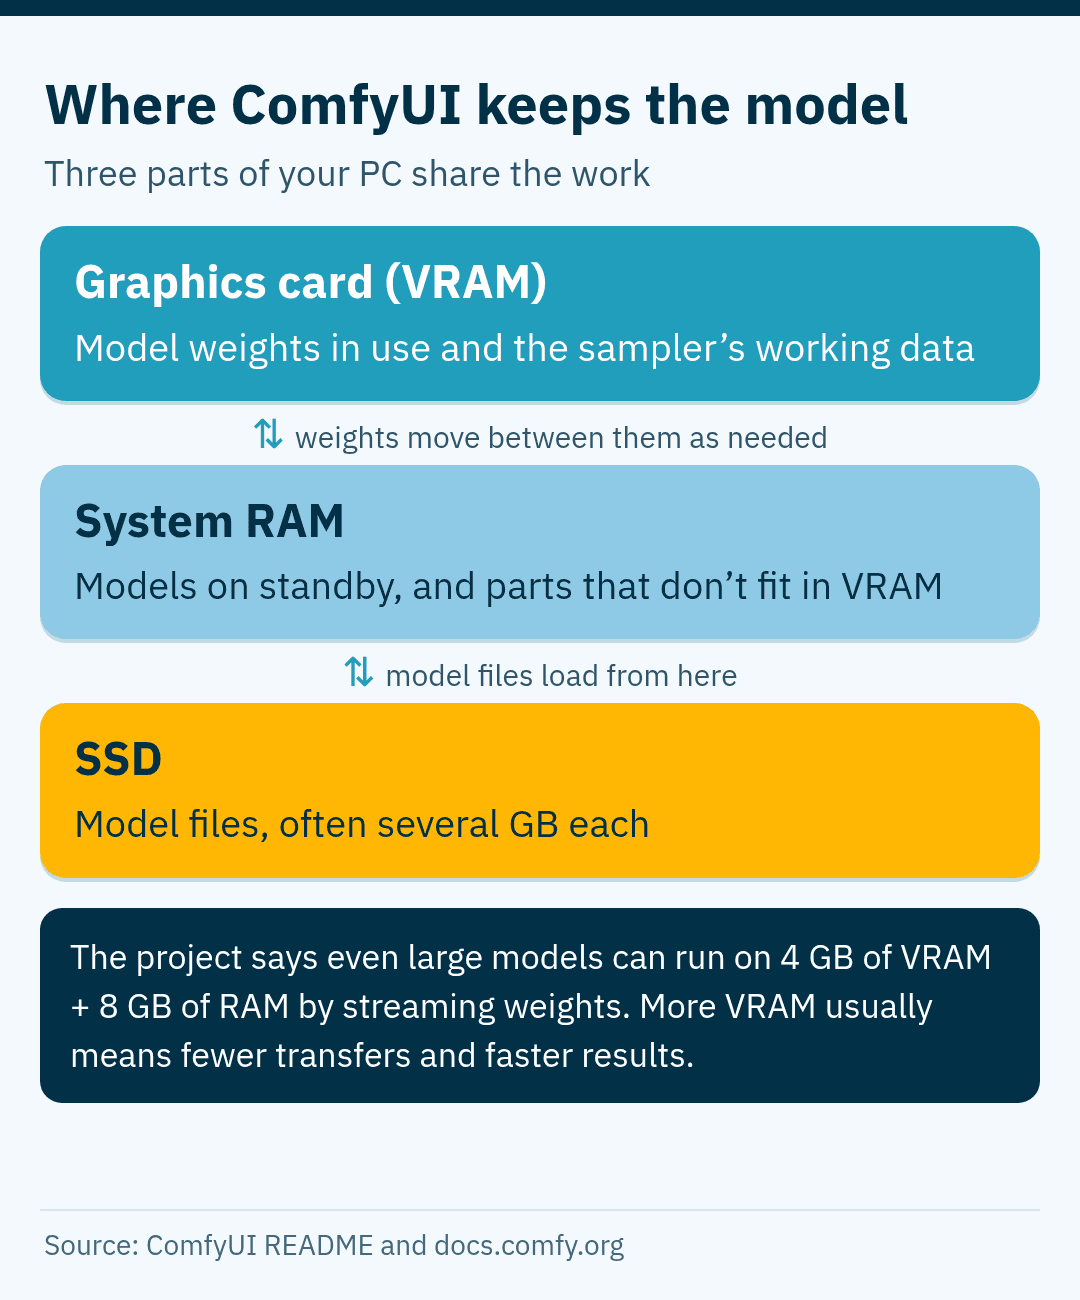
The project says ComfyUI can run even large models on as little as 4 GB of VRAM and 8 GB of RAM by streaming weights between RAM and the GPU. That makes low-end cards usable, not fast: more VRAM means fewer transfers and quicker results, especially with large image models and video. The official SD1.5 tutorial, for example, describes that roughly 4 GB model as running smoothly on a consumer card with about 6 GB of VRAM.
NVIDIA cards have the broadest support. According to the system requirements, ComfyUI also runs on AMD cards through ROCm (Linux and Windows), Intel Arc, Apple Silicon Macs through PyTorch's MPS backend, and even the CPU, which is much slower. Some community custom nodes are written with NVIDIA in mind, so check before relying on them with other hardware.
There are three ways to install it. The desktop app is the easiest. The Windows portable build bundles its own Python in one folder, which avoids conflicts with other software; there are builds for NVIDIA, AMD and Intel cards. A manual install with Git works on every system and gives you the latest changes first.
Anatomy of a node
Every node follows the same layout. The title bar shows its name and lets you collapse it; right-clicking the node (or using the selection toolbox) changes its mode, for example to bypass. Inside are widgets: number fields, text boxes and drop-down menus for its settings. Inputs sit on the left edge and outputs on the right.
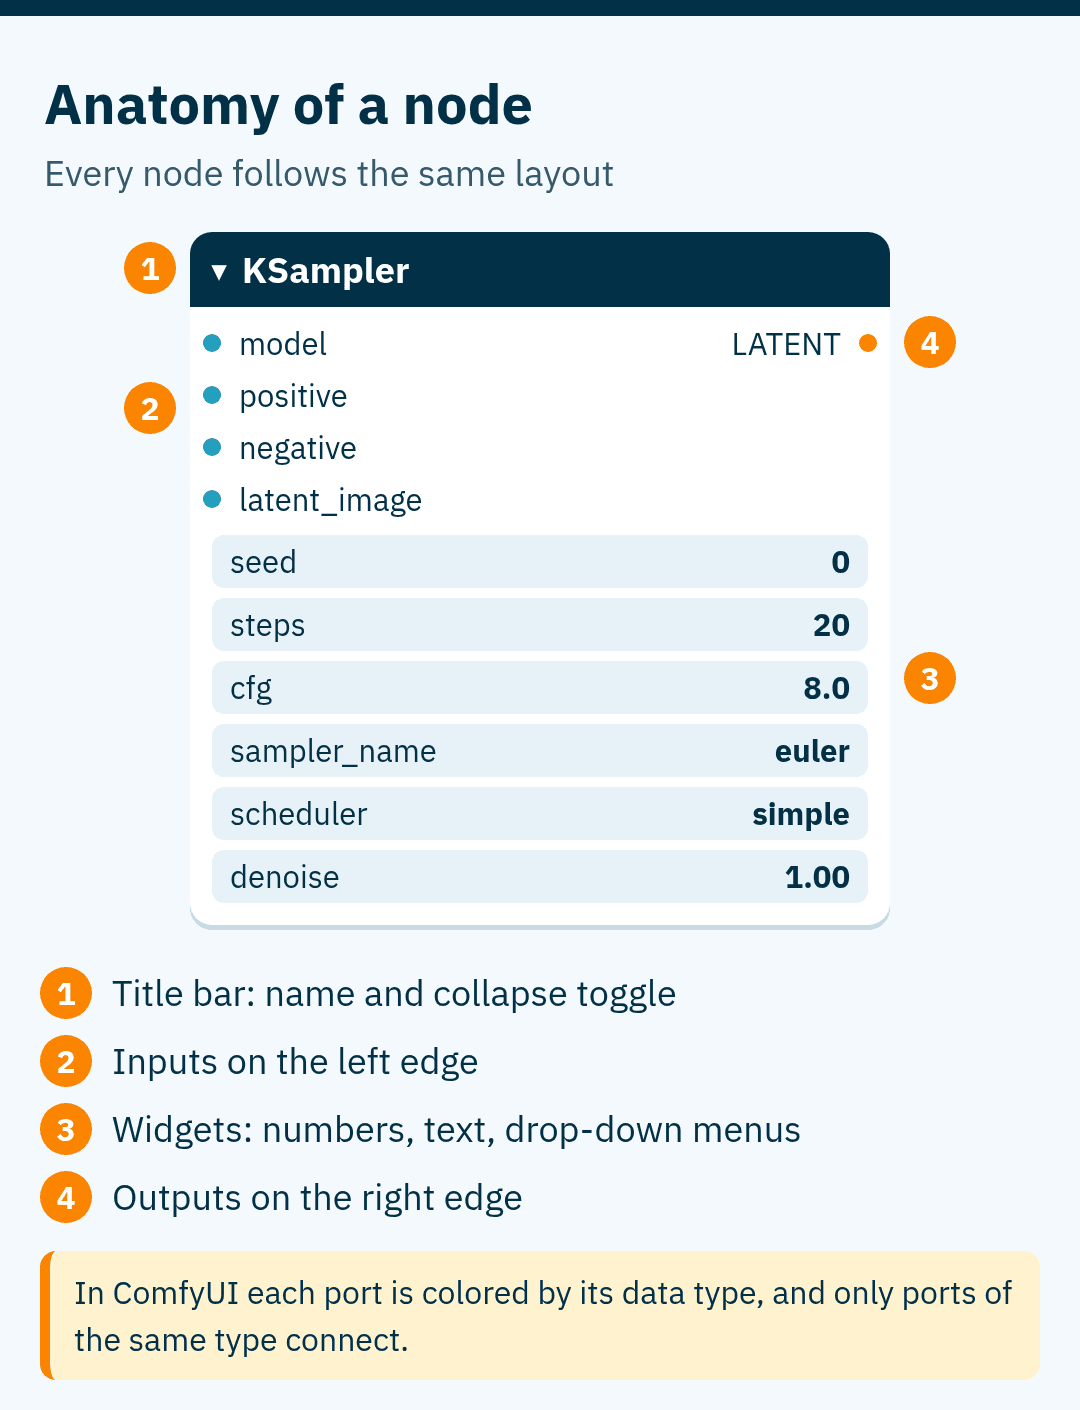
Each link carries one data type, and ComfyUI colors ports and links by type. You can only connect ports of the same type, which prevents many mistakes. The colors below are the defaults listed in the official documentation; themes can change them.
Scroll horizontally to see all columns
| Type | What it carries | Default color |
|---|---|---|
| MODEL | The diffusion model (UNet or DiT) that removes noise | Lavender |
| CLIP | The text encoder that turns prompts into vectors | Yellow |
| VAE | Converts between pixels and latent space | Rose |
| CONDITIONING | Encoded prompts and other guidance | Orange |
| LATENT | The compressed image the sampler works on | Pink |
| IMAGE | Normal RGB pixels | Blue |
| MASK | Which area of an image to change | Green |
The basic text-to-image workflow
The default workflow has six kinds of nodes, and almost every other workflow is a variation of it.
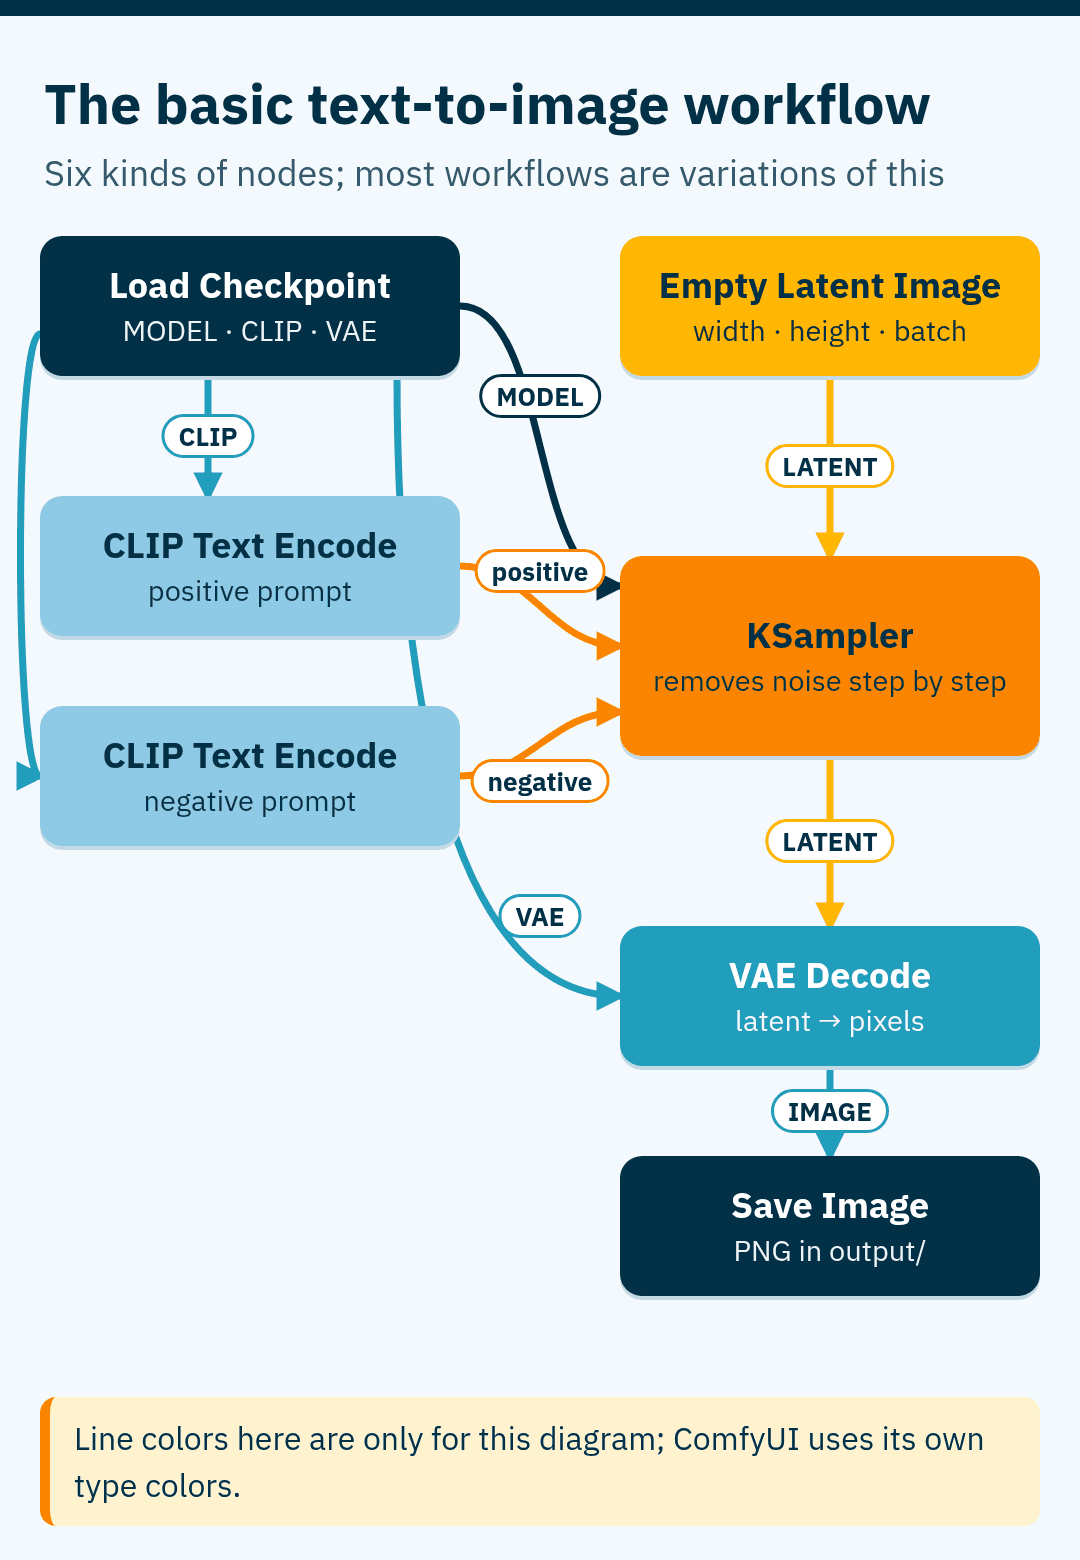
- Load Checkpoint reads a model file and outputs three things: MODEL, CLIP and VAE.
- Two CLIP Text Encode nodes use CLIP to encode the positive prompt (what you want) and the negative prompt (what you don't). Their CONDITIONING outputs go to the sampler's positive and negative inputs.
- Empty Latent Image creates the blank canvas in latent space. You set width, height and batch size here.
- KSampler takes the model, both conditionings and the latent, and removes noise step by step.
- VAE Decode turns the sampler's latent result into pixels using the VAE.
- Save Image (or Preview Image) shows the result and saves it to the output folder.
Why a "latent" canvas? Diffusion models do not work on pixels directly. With the VAEs used by Stable Diffusion and Flux, the latent is 8 times smaller than the image on each side, so a 1024 × 1024 image becomes a 128 × 128 latent. That is why generation is feasible on consumer cards, and why the width and height in ComfyUI move in steps of 8.
KSampler settings that matter
KSampler is where the image is actually made, and its settings decide quality, speed and how closely the result follows your prompt.
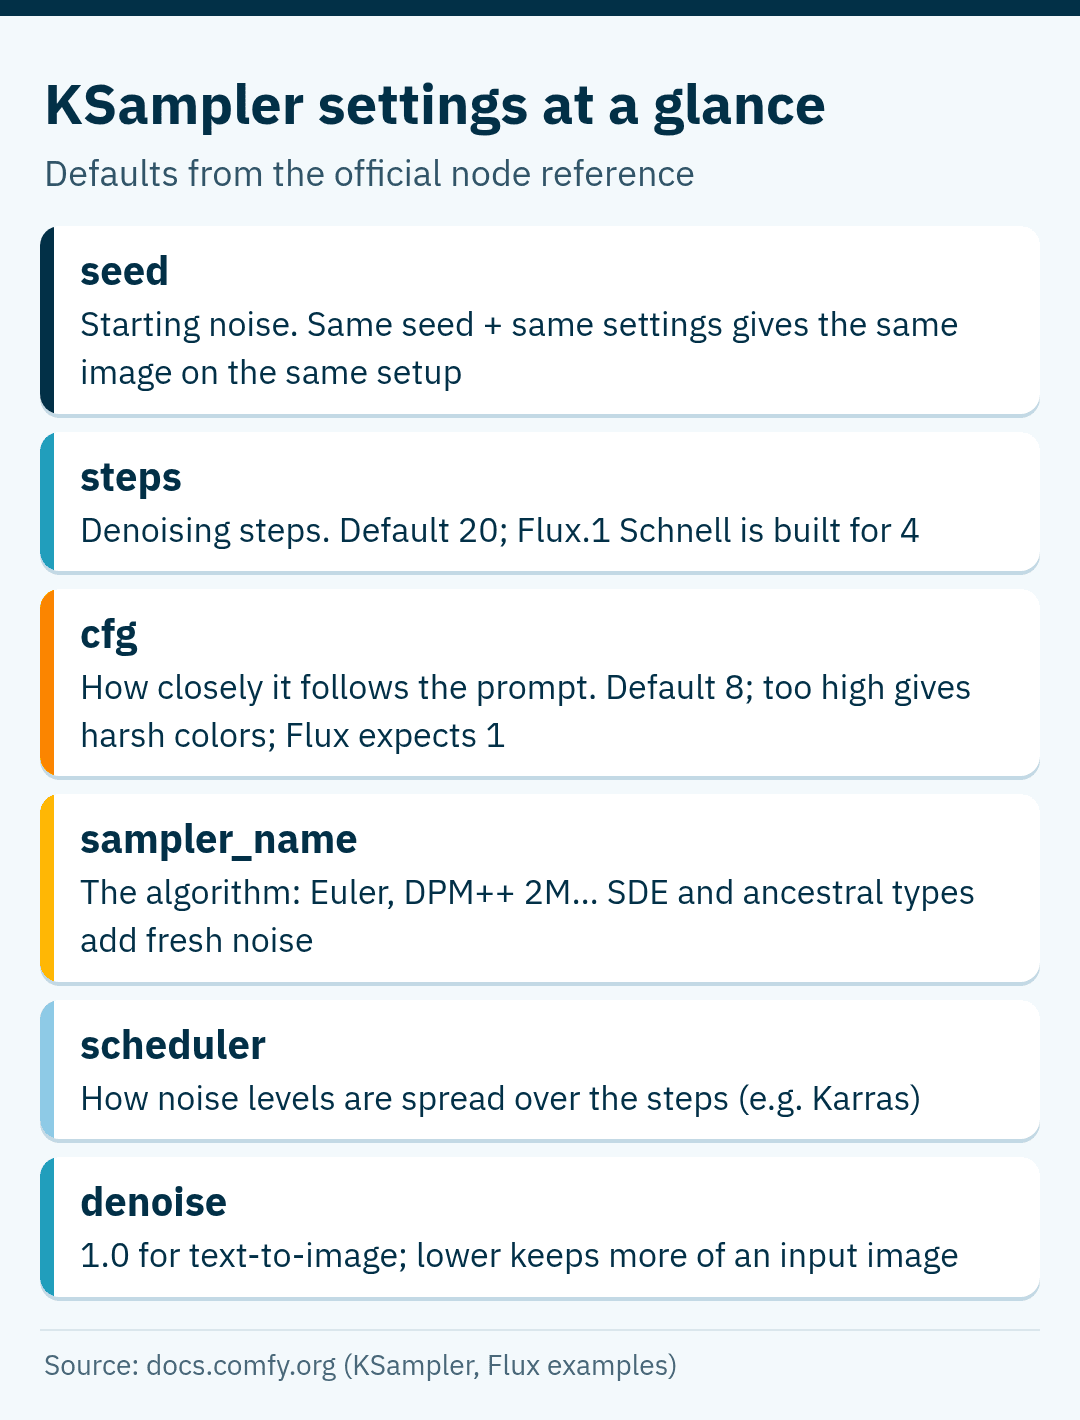
Seed sets the starting noise. The same seed with the same model, settings and software gives the same image, and the control after generate option decides whether the seed stays fixed, changes randomly, or goes up or down by one after each run. ComfyUI creates this noise on the CPU, which helps results match across machines, but exact repeats are not guaranteed: a different GPU, driver or ComfyUI version can change the output slightly. Even the --deterministic launch option is documented as not making images deterministic in all cases.
Steps is the number of denoising steps; the default is 20. More steps take longer and usually improve detail only up to a point. Some models are built for very few steps: the official Flux.1 Schnell workflow uses 4.
CFG controls how strongly the image follows the prompt. The default is 8; too high a value hurts quality, often as harsh colors and artifacts, while too low lets the model drift from the prompt. The right range depends on the model: distilled models such as Flux expect a CFG of 1, and ComfyUI's Flux examples say so explicitly.
Sampler is the algorithm that removes the noise. Euler is simple and fast, DPM++ 2M is a common choice that converges well in a moderate number of steps, and the SDE and "ancestral" variants add fresh noise during sampling, which changes the look and makes results vary more.
Scheduler decides how the noise levels are spread across the steps. Karras, for example, spends more of its steps at the low-noise end, which many people find gives finer detail.
Denoise sets how much of the starting latent is replaced. Keep it at 1.0 for text-to-image. Lower values are for image-to-image, covered below.
From latent to PNG, with the workflow inside
VAE Decode runs the VAE's decoder to turn the latent into normal pixels, and Save Image writes the result to ComfyUI's output folder.
ComfyUI also stores the whole workflow, including the seed, inside the PNG's metadata. Drag that PNG back onto the canvas and the exact graph that made it reappears, which makes PNGs a convenient way to share workflows. Two caveats: the --disable-metadata launch option turns this off, and websites or apps that re-save or compress images may strip the metadata.
Image-to-image and inpainting
For image-to-image, replace Empty Latent Image with two nodes: Load Image, then VAE Encode, which turns your picture into a latent. Feed that latent to KSampler and lower denoise.
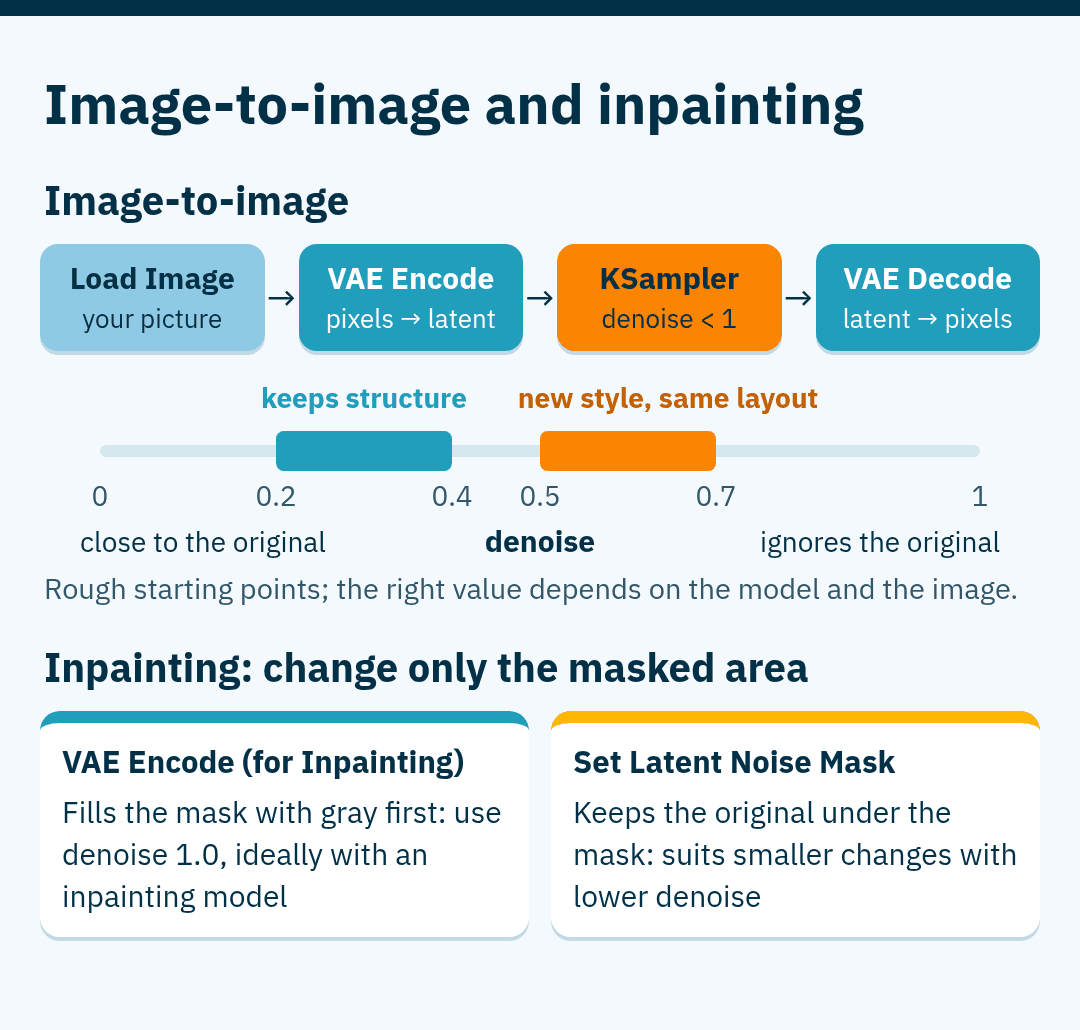
Denoise is now the key setting: the lower it is, the closer the result stays to the original. As rough starting points, low values around 0.2 to 0.4 keep the structure and change details, while 0.5 to 0.7 change the style more while usually keeping the composition. The right value depends on the model and the image. Note that a lower denoise does not mean fewer steps: ComfyUI still runs the steps you set, over the low-noise part of a longer schedule, as the image-to-image guide explains.
Inpainting changes only part of an image. You draw a mask with the built-in mask editor (or use an image's transparency), and the mask tells the sampler where it may work. Core ComfyUI offers several ways to do this (the inpainting guide walks through the first):
- VAE Encode (for Inpainting) fills the masked area with neutral gray before encoding, so it works best with denoise at 1.0, ideally with a model trained for inpainting. Its grow_mask_by setting widens the mask to soften the seam.
- Set Latent Noise Mask keeps the original content under the mask, so it suits smaller changes with lower denoise and ordinary models.
- InpaintModelConditioning prepares the image, mask and prompts together for inpainting models.
LoRA and ControlNet
A LoRA is a small add-on file that adjusts a model toward a style, character or subject without replacing it. LoRAs are usually much smaller than the checkpoint they modify; their size depends on the base model and how they were trained. The Load LoRA node sits between Load Checkpoint and the rest of the graph on both the MODEL and CLIP paths. Its strength_model and strength_clip settings control how strongly it affects the image model and the text encoder, and several Load LoRA nodes can be chained.
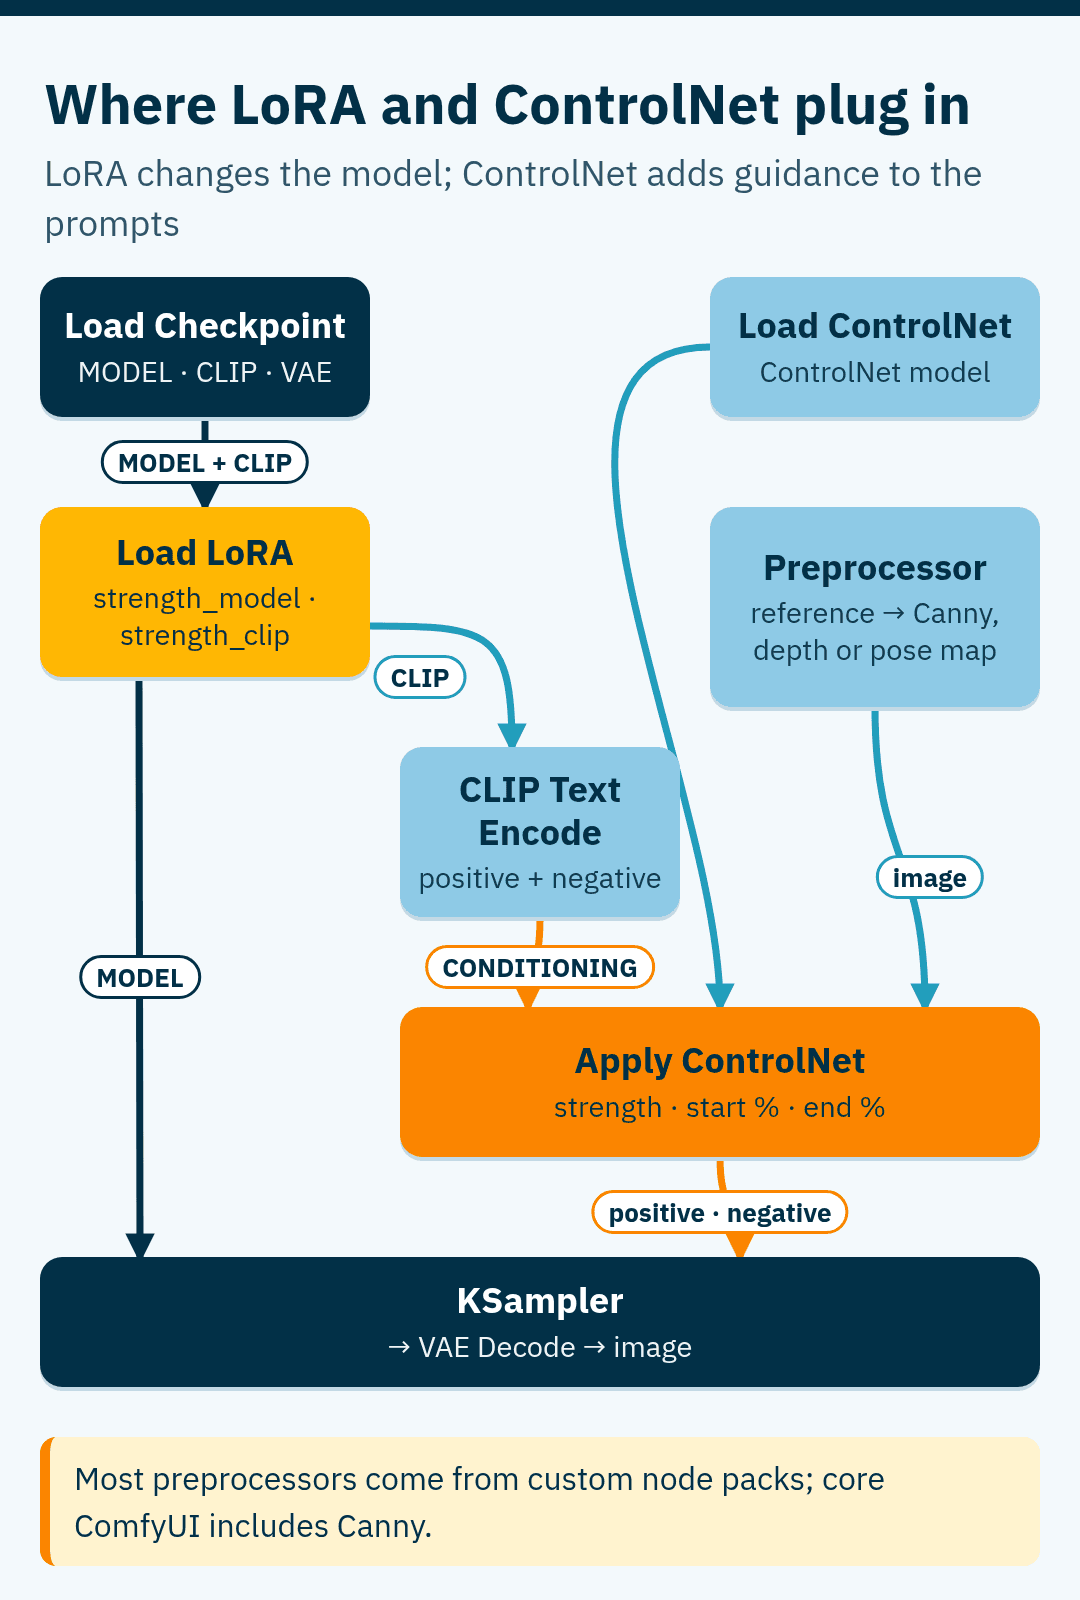
ControlNet guides the composition with a reference map instead of words: edges, depth, or a human pose. A preprocessor turns your reference image into that map. Core ComfyUI includes a Canny edge node, while most other preprocessors (depth, line art, OpenPose and more) come from custom node packs such as comfyui_controlnet_aux.
Load ControlNet loads the model, and Apply ControlNet adds it to both the positive and negative conditioning before they reach KSampler. Strength sets how strongly it constrains the image, and start_percent and end_percent set during which part of the sampling it applies. The ControlNet guide shows a complete example.
Keeping big workflows tidy
Workflows grow quickly. A few habits keep them readable:
- Groups (Ctrl+G) put a colored frame around related nodes, such as "prompts" or "upscaling".
- Reroute points move wires out of the way; the canvas has a native reroute feature for new workflows.
- Bypass (Ctrl+B) skips a node and passes its input straight through, so you can switch off a LoRA without rewiring. Mute (Ctrl+M) stops a node completely, which breaks anything that depends on it.
- Subgraphs collapse a set of nodes into one reusable node.
- Primitive nodes let one value, such as width or height, feed several nodes at once.
Conclusion
ComfyUI turns image generation from pressing a button into designing a pipeline. The learning curve is real, but the concepts are few: data types and links, latent versus pixel space, the sampler's settings, and the add-ons that plug into the conditioning and model paths. Once those make sense, you can read any shared workflow, fix it when it breaks, and fit it to your own hardware.
The fastest way to start is the default text-to-image workflow: change one setting at a time, watch what it does, then add image-to-image, a LoRA or a ControlNet one step at a time.
Related Articles
View all articles →
Claude Code Mods: a practical guide to customizing Claude Code from the inside
Anthropic added mods to Claude Code on October 1, 2026. Here is what a mod is, how it differs from prompts, skills and hooks, what the popular example mods actually do, and how to install, build and remove them safely.

Getting Started with DeerFlow: Setup Wizard, Docker, and Practical Workflows
A practical guide to configuring DeerFlow, setting up model providers, running exact Docker commands, verifying startup, and executing document comparisons.

8 AI Coding Agent Tools for Verification, Efficiency, and UI
A technical guide to eight developer tools for coding agents, covering runtime verification, token reduction, 3D generation, UI skills, and linter rules.
Want this for your product?
Send a short note about your project. We will review it and explain the next useful step.
Contact Our Team